



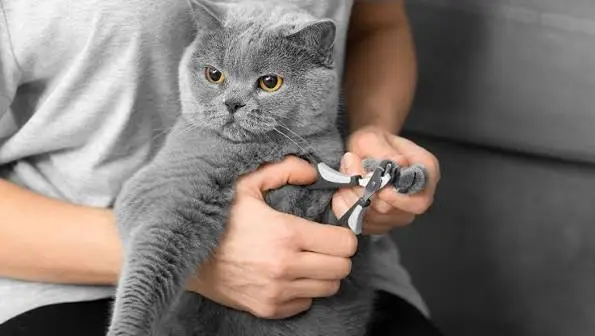
Step-by-Step Guide to Proper Cat Nail Trim Techniques
Have you ever looked at your cat’s claws after finding new scratches on the sofa and wondered if it’s finally time for a cat nail trim? You’re certainly not alone. Many cat owners feel nervous about trimming their pet’s nails because they worry about hurting them or making the experience stressful. The good news is that nail trimming doesn’t have to be difficult. With the right tools, a calm approach, and a little patience, it can become a quick part of your regular pet care routine.
Regular nail maintenance does much more than protect your furniture. It helps prevent painful overgrown claws, reduces accidental scratches, and supports healthy movement, especially for older cats. Throughout this guide, you’ll learn exactly how to trim your cat’s nails safely, understand feline nail anatomy, avoid common mistakes, and build your cat’s confidence during every trimming session.
Why Regular Cat Nail Trim Matters
A regular cat nail trim is about much more than appearance. Healthy claws play an important role in your cat’s balance, climbing ability, and overall comfort. When nails become too long, they may curl into the paw pads, causing pain, infections, and difficulty walking. This is especially common among senior cats who scratch less often and naturally wear down their claws more slowly.
Indoor cats usually need more frequent trimming because carpets and furniture don’t wear their claws down as effectively as trees, rocks, and rough outdoor surfaces. Many veterinarians recommend checking your cat’s nails every two to four weeks. However, every cat is different. Active kittens may naturally keep their nails shorter through play, while older cats often benefit from more frequent maintenance.
Keeping nails properly trimmed also reduces accidental scratches during play or handling. Children and elderly family members particularly benefit from a cat with well-maintained claws. At the same time, your favorite furniture, curtains, and carpets are less likely to become targets for overly sharp nails.
Another important advantage is early detection of health issues. During each nail trimming session, you naturally inspect your cat’s paws. This gives you the opportunity to notice cuts, swelling, infections, broken nails, or foreign objects before they become serious problems.
Health Benefits for Your Cat
Healthy claws contribute directly to your cat’s daily comfort. Long nails may change the way your cat walks, putting extra pressure on joints and muscles. Over time, this can affect mobility, particularly in senior cats with arthritis.
Routine nail care also prevents claws from splitting or breaking. Broken nails are often painful and may bleed heavily if torn too close to the quick. By trimming small amounts regularly, you significantly reduce this risk.
Many veterinary professionals also point out that handling your cat’s paws regularly makes future veterinary examinations much easier. Cats that become accustomed to gentle paw handling generally experience less stress during routine health checks.
Protecting Your Home and Family
Scratching is a completely natural feline behavior. Cats scratch to stretch their muscles, mark territory, and remove old nail sheaths. A cat nail trim doesn’t eliminate scratching, but it dramatically reduces the damage caused by sharp claws.
Homes with multiple pets often experience fewer accidental injuries after routine trimming. During play, even friendly cats can unintentionally scratch one another. Shorter nails reduce these risks without interfering with natural behavior.
Families with young children also appreciate the added safety. Curious toddlers frequently approach cats without understanding boundaries. Although proper supervision is essential, trimmed nails help minimize accidental scratches if a startled cat reacts suddenly.
Understanding Your Cat’s Nails
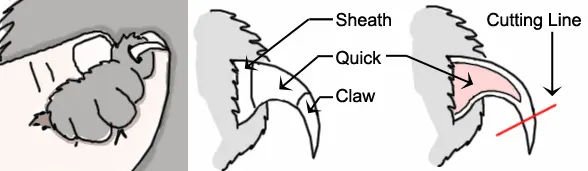
Before attempting your first cat nail trim, it’s important to understand basic feline nail anatomy. Each claw contains a hard outer shell surrounding a sensitive inner area known as the quick. The quick contains blood vessels and nerves, making it painful if accidentally cut.
Cats with white or clear nails make the quick relatively easy to identify because it appears as a pink section extending into the claw. Cats with dark-colored nails require extra caution since the quick is much harder to see. In these cases, trimming only the curved hook at the tip is usually the safest approach.
Cats also shed the outer layers of their nails naturally. You may occasionally find thin, hollow claw sheaths around your home. This is perfectly normal and indicates healthy nail growth.
The Quick Explained
The quick deserves special attention because avoiding it is the most important rule of nail trimming. Cutting into this sensitive tissue causes pain and bleeding, which can create lasting fear of future trimming sessions.
If you’re uncertain about where the quick ends, always trim less rather than more. Small, frequent trims are far safer than attempting to remove too much nail at once.
Keeping styptic powder nearby provides additional peace of mind. Although accidents are uncommon with careful trimming, styptic powder quickly stops minor bleeding if the quick is accidentally nicked.
Front vs. Back Claws
Many new cat owners don’t realize that front and back claws grow differently. Front claws tend to grow faster and become sharper because cats rely on them for climbing, hunting instincts, and gripping toys.
Back claws usually wear down naturally through walking and jumping. Consequently, many cats require frequent trimming only on the front paws. Nevertheless, every trimming session should include checking all four paws for overgrown nails.
Pay particular attention to the dewclaws located slightly higher on the inside of the front legs. Since these claws rarely touch the ground, they receive almost no natural wear and often become overgrown if ignored.
Tools You Need Before You Start
Choosing quality equipment makes every cat nail trim safer and more comfortable. While there are many grooming products available, only a few essentials are truly necessary.
| Tool | Purpose | Recommended |
| Cat nail clippers | Safe trimming | ✔ |
| Styptic powder | Stops bleeding | ✔ |
| Treats | Positive reinforcement | ✔ |
| Soft towel | Gentle restraint | Optional |
| Flashlight | Better visibility | Helpful |
Avoid using ordinary human nail clippers unless specifically recommended by your veterinarian. Cat-specific clippers are designed to cut cleanly through curved feline nails without crushing them.
Scissor-style clippers work well for beginners because they provide better control. Guillotine-style clippers also perform effectively but may require slightly more practice.
Choosing the Best Nail Clippers
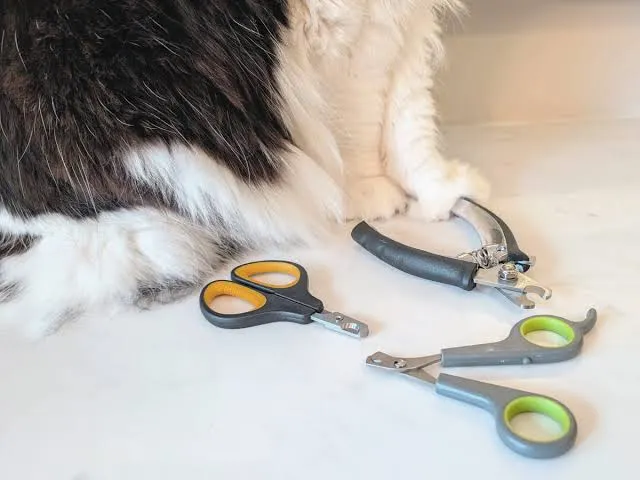
High-quality clippers should feel comfortable in your hand and have sharp stainless steel blades. Dull blades can crush the nail instead of making a clean cut, increasing discomfort.
Many experienced groomers recommend replacing inexpensive clippers every few years to maintain clean cuts.
Ergonomic handles with non-slip grips provide better control, particularly if your cat moves unexpectedly during trimming.
Helpful Accessories
Although not absolutely necessary, several accessories make trimming easier:
- Soft blanket or towel for anxious cats.
- LED flashlight for dark-colored nails.
- Favorite treats for positive reinforcement.
- Cat pheromone spray to encourage relaxation.
- Scratching post for healthy claw maintenance between trims.
One practice that many experienced cat owners recommend is offering a treat after trimming each paw. This creates a positive connection between grooming and rewards, making future sessions much easier.
Preparing Your Cat for a Cat Nail Trim
The secret to a successful cat nail trim starts long before you pick up the clippers. Cats thrive on routine, and introducing nail trimming gradually can make the experience much less stressful. Instead of waiting until your cat’s nails become overly long, begin by gently touching and massaging their paws during relaxed moments, such as after a meal or while they’re resting on your lap.
In my experience, patience makes all the difference. One of my cats accepted nail trimming after only a few short sessions, while another needed nearly two weeks of gentle paw handling before feeling comfortable. Every cat has a unique personality, so avoid comparing your pet to others. Building trust is always more important than finishing quickly.
Choose a quiet room without loud noises or distractions. Turn off the television, keep other pets away, and have everything ready before bringing your cat over. The fewer interruptions there are, the calmer the session will be.
If your cat becomes nervous, stop and try again later rather than forcing the process. Positive experiences today make future grooming much easier.
Creating a Calm Environment
A calm environment helps your cat feel secure. Soft lighting, a familiar blanket, and gentle talking can all reduce anxiety. Some owners find that trimming nails after a play session works well because their cat is naturally more relaxed.
Keep the session short. If your cat only allows you to trim two or three nails, that’s perfectly fine. You can finish the remaining nails another day.
Reward your cat immediately with praise, treats, or a favorite toy. Positive reinforcement teaches them that nail trimming leads to something enjoyable.
Building Positive Associations
Many cats learn through repetition. Pair every trimming session with rewards so your cat begins to expect something pleasant afterward.
Helpful ideas include:
- Offer a favorite treat after each paw.
- Speak in a calm, reassuring voice.
- Avoid punishment if your cat resists.
- End the session on a positive note.
These simple habits build confidence over time and make grooming much less challenging.
Step-by-Step Cat Nail Trim Guide
Performing a cat nail trim becomes much easier when you follow a consistent process.
Step 1: Position Your Cat
Place your cat comfortably on your lap or a stable table covered with a towel. Support their body gently without squeezing.
Step 2: Hold the Paw
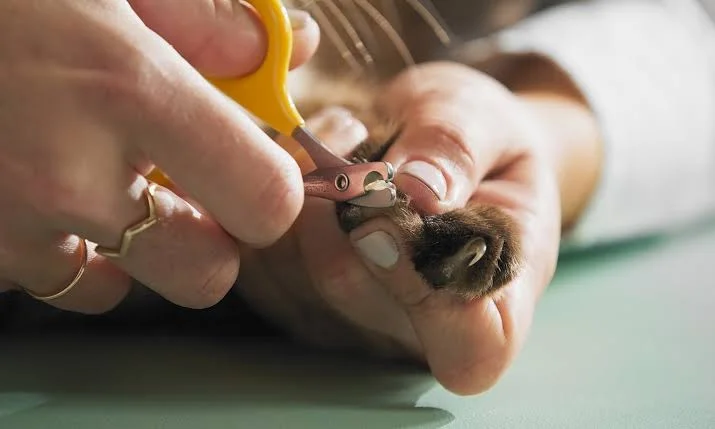
Press lightly on the top and bottom of one toe. This extends the claw so you can clearly see where to trim.
Step 3: Locate the Quick
Identify the pink area inside light-colored nails. For dark nails, trim only the sharp curved tip.
Step 4: Trim Carefully
Cut only a small portion of the nail using smooth, confident movements. Never rush.
Step 5: Repeat
Continue with each nail, allowing your cat short breaks if needed.
Step 6: Reward
Finish with praise, treats, and affection to reinforce good behavior.
Remember, nail trimming for cats should never feel like a race. Slow, steady progress creates better long-term results.
Holding Your Cat Correctly
Proper handling reduces stress for both you and your cat.
Avoid holding your cat too tightly, as this often causes struggling. Instead, support their body naturally while allowing them to remain comfortable.
For particularly nervous cats, wrapping the body loosely in a towel—often called the “kitty burrito” technique—can provide gentle security while leaving one paw exposed.
If another family member is available, they can calmly comfort the cat while you focus on trimming.
Trimming Each Nail Safely
Trim only the transparent hook at the end of the claw.
Never attempt to remove large sections in one cut.
If you accidentally cut the quick:
- Stay calm.
- Apply styptic powder.
- Use gentle pressure for a few moments.
- Comfort your cat before ending the session.
Small accidents are uncommon and usually heal quickly when handled properly.
Common Mistakes to Avoid
Even experienced owners occasionally make mistakes. Fortunately, they’re easy to prevent.
| Mistake | Better Approach |
| Cutting too much | Trim only the tip |
| Using dull clippers | Keep blades sharp |
| Forcing the cat | Take breaks |
| Ignoring dewclaws | Check every nail |
| Waiting too long | Trim regularly |
Another common mistake is trimming when you’re in a hurry. Cats sense tension, so choosing a relaxed moment usually leads to a smoother experience.
Special Tips for Kittens, Seniors, and Indoor Cats
Different cats have different grooming needs.
Kittens
Start handling paws as early as possible. Early exposure helps kittens accept grooming throughout life.
Senior Cats
Older cats often develop thicker claws and reduced flexibility. Check their nails every two to three weeks since they may scratch less frequently.
Indoor Cats
Indoor cats usually require more frequent trimming because they have fewer opportunities to naturally wear down their nails.
When to Visit a Groomer or Veterinarian
Some situations require professional assistance.
Contact a veterinarian or professional groomer if you notice:
- Ingrown nails
- Bleeding that won’t stop
- Swollen paws
- Broken claws
- Signs of infection
- Extreme fear or aggression
Professional groomers are trained to handle nervous cats safely, while veterinarians can identify medical problems affecting nail growth.
Expert Tips for Stress-Free Nail Care
Veterinary professionals often recommend making nail trimming part of your regular health routine rather than waiting until nails become excessively long.
Helpful habits include:
- Trim every 2–4 weeks.
- Inspect paws regularly.
- Replace worn clippers.
- Keep sessions under 10 minutes.
- Always reward your cat afterward.
Consistency is more valuable than perfection.
Conclusion
A regular cat nail trim is one of the easiest ways to support your cat’s long-term health and comfort. By trimming only the tips, using the right tools, and creating positive experiences, you can transform what seems like a difficult task into a simple routine. Remember that every cat learns at its own pace, so patience is essential.
Healthy claws help your cat move comfortably, reduce accidental scratches, and prevent painful nail problems. Whether you’re trimming a playful kitten’s tiny claws or helping a senior cat stay comfortable, gentle handling and consistency make all the difference. With practice, confidence grows for both you and your feline companion.
Frequently Asked Questions
Are you supposed to trim your cat’s nails?
Yes. Most indoor cats benefit from nail trimming every two to four weeks to prevent overgrown claws and reduce accidental scratches.
What is the easiest way to trim a cat’s nails?
Trim your cat’s nails when they’re calm or sleepy, use sharp cat nail clippers, and reward them with treats after each paw.
Which nails should you trim on a cat?
Trim the sharp tips of all claws, especially the front claws and dewclaws, while avoiding the pink quick.
Can nail trimming be stressful for cats?
It can be at first, but gradual training, gentle handling, and positive reinforcement usually make the process much easier.
How long can a cat go without a nail trim?
Many cats need trimming every 2–4 weeks. However, growth rates vary depending on age, activity level, and whether the cat lives indoors or outdoors.
⭐ Make MindLiva Your Preferred Source on Google
Get trusted health, wellness, and lifestyle articles from MindLiva.
Add MindLiva
Samie Babaei is a medical science student at Shahid Beheshti University of Medical Sciences with a strong interest in health, wellness, and medical research. As a health writer and researcher at MindLiva, she focuses on creating clear, evidence-based content that helps readers better understand health and well-being.